In this section we will setup Kali Linux, Windows 7 and Metasploitable 2 as Virtual Machines
(VMs) using VMWare Player on a host computer.
Setting up our testing lab using virtual machines makes it very easy to learn offensive computer
security testing using Kali.
Virtual machines make it possible to run several operating systems on a single computer. That way
we do not need a room full of computers to set up a testing and learning environment. We only need
one machine powerful enough to run several Virtual Machine sessions at once.
For the book I used a Windows 7 Core I-5 system with 8 GB of RAM. It had plenty of power to run
all three of our lab operating systems at the same time with no problem at all.
If you have experience with Virtual Systems, you can use any Virtual Machine software that you want.
But for this tutorial I will be using VMWare Player as the host software, and then install Kali,
Metasploitable 2 and Windows 7 in separate VMs running under the host.
When done, you should have a small test network that looks something like this
Because we will be dealing with vulnerable operating systems, make sure that you have a Firewall
Router (Preferably hardware) between the Host system and the live internet.
Install VMWare Player & Kali
Installing Kali on VMWare is extremely simple as Offensive Security provides a Kali WMWare
image that you can download, so we will not spend a lot of time on this.
Download and install VMWare Player for your version of OS.
Download and install VMWare Player (https://my.vmware.com/web/vmware/downloads)
2. Agree to the license agreement and choose where you want it to install it, the default is
normally fine.
3. Click, “Finish” when done.
4. Download the Kali VMWare Image ( http://www.kali.org/downloads/) and save it in a
location where you want it to run from.
5. Un-GZip and Un-Tar the downloaded image 7-Zip works great.
6. Start the VMWare Player.
7. Click, “Player” from the menu.
8. Then “File”
9. Next click, “Open”.
10. Surf to the extracted Kali .vmx file, select it, and click, “Open”.
11. It will now show up on the VMWare Player home screen:
12. With the Kali VM highlighted click, “Edit Virtual Machine Settings
13. Here you can view and change any settings for the VM:
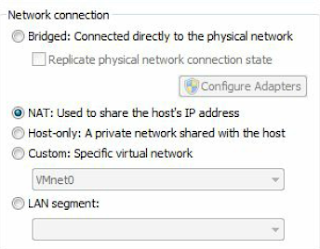
14. Click, “Network Adapter
It is set to NAT by default. This will be good enough for what we are doing. NAT means that each
Virtual machine will be created in a small NAT network shared amongst themselves and with the
host; they can also reach out to the internet if needed.
Each machine will be given a DHCP IP address, which means that the IP addresses might change on
the VMs when you reboot them.
(If you need to know Kali’s or Metasploitable’s IP address, just type “ ifconfig” in a Terminal
window. On a Windows based VM, just type “ipconfig” at a command prompt.)
15. Click “cancel” to return to the VMWare Player main screen.
16. Now just click, “Play Virtual Machine”, to start Kali. You may get a message asking if the
VM was moved or copied, just click, “I copied it”.
17. When prompted to install VMWare tool, select to install them later.
18. When Kali boots up you will come to the Login Screen:
backwards).
20. You will then login to Kali and be presented with the main Desktop:
Congratulations, you did it!
Updating Kali
We will cover getting around in Kali a little later, but first, we need to update Kali to the latest
version. The VM image is a bit old, so there are a lot of updates that could take a while to download.
1. Open a Terminal Window:
2. Type, “apt-get update” and hit “enter:
3. And then, “apt-get dist-upgrade:
(Type, “y” and enter when prompted that additional disk space will be needed.)
This can take quite a while, so this might be a good time for a break, you deserve it!4. When done, reboot.


